Outpainting II - Differential Diffusion

This is the third guide about outpainting, if you want to read about the other methods here they are:
In this guide I'll explore how to do outpainting with differential diffusion in depth going though each of the steps I did to get good results.
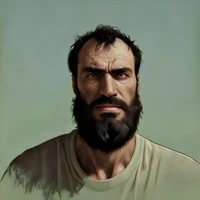
I’ll start with a non-square image that has a depth of field (bokeh) to make it more difficult. When they have this kind of background, it’s really easy to see the seams. This is an image that I grabbed from Unsplash:

So, the first task is to make it a square image (expand it) so we can keep making it bigger, but I’ll generate images of 1024x1024 each time as this is the optimal resolution for SDXL.
Then, I’ll test the result if I just use the new area with a gray background. But to also do that, we need to create a mask that can work with differential diffusion. For this, I’ll move the margin 50 pixels to the left and apply a blur filter. This helps to smooth the transition.
| squared image | mask | blurred mask |
|---|---|---|
 |
 |
 |
We're going to use the community pipeline StableDiffusionXLDifferentialImg2ImgPipeline and it's loaded like this:
pipeline = StableDiffusionXLPipeline.from_pretrained(
    "stabilityai/stable-diffusion-xl-base-1.0",
    torch_dtype=torch.float16,
    variant="fp16",
    custom_pipeline="pipeline_stable_diffusion_xl_differential_img2img",
).to("cuda")

image = pipeline(
    prompt=prompt="",
    negative_prompt="",
    width=1024,
    height=1024,
    guidance_scale=6.0,
    num_inference_steps=25,
    original_image=image,
    image=image,
    strength=1.0,
    map=mask,
).images[0]
At this point, If we generate the image without a prompt, the model will think that the gray area is a gray object like a wall:
 |
 |
If this is used by someone who knows how to draw, that person could make a rough drawing and generate the image. Since I’m not that person, I’ll need to think of a prompt for the new outpainting area.
For this, we can create it ourselves, use an online chatbot like GPT-4V or Bing Chat, or a local VLLM like Llava. Personally, I always like to use local VLLMs, and this one got my attention: internlm-xcomposer2-vl-7b-4bit because it works really well, even with just the 4-bit version.
This is what I got:
The image captures a man standing on the shore of a body of water, possibly a lake or river. He is wearing a white hoodie with the word 'evolution' written across it and khaki pants. A green backpack is slung over his shoulders, and he holds a camera in his hands. The backdrop features a mountain range under a clear sky.
for a comparison, this is what bing gave me:
The image depicts a photographer, dressed in outdoor gear and holding a professional camera, set against a stunning backdrop of a serene lake and snow-capped mountains. It’s a beautiful blend of human activity and natural beauty.
When doing inpainting or outpainting, the prompt is really important, as an example, these are the results with both prompts:
| XComposer2 | XComposer2 |
|---|---|
 |
 |
| Bing | Bing |
 |
 |
For this specific image, and perhaps for SDXL in general, the prompt generated by XComposer2 is better because it describes the image without exaggerated words like stunning backdrop, beautiful blend or natural beauty.
Taking the XComposer2 prompt and fixing the seed, let’s see how differential diffusion works.
| normal mask | blurred mask |
|---|---|
 |
|
 |
|
We can see that differential diffusion blends the outpaint better with the original image, even when they’re totally different. Let’s see what happens when we increase the blur.
| blur radius 20 | blur radius 40 |
|---|---|
|
 |
| blur radius 80 | blur radius 100 |
 |
 |
Now, we can clearly see why differential diffusion is a really good method for inpainting and outpainting. With this outpaint area and with a blur of 80 or 100, the only reason we can see the seam is because of the color difference. Just take into account that the larger the blur and the area, the more the original image will change.
To solve this problem with the color, or at least attenuate it, we need to fill the new area with something else. Something that helps the model better understand what we want in the new area.
There are several techniques that can do this. Each of them helps but has different uses. For example, PatchMatch or LaMa helps with inpainting since they remove the content and fill it with a new one. For this use case, those don’t work that well because the area they need to fill is too big and completely new. So, I’ll use the OpenCV ones. In this case, I like the result with the telea algorithm.
To use this method, it’s necessary to install OpenCV for Python:
pip install opencv-python
It’s not a good idea to convert images between multiple libraries because it can result in a loss of quality. So, for this, I’ll convert all the functions to OpenCV. The only major difference is the blur. To obtain an effect similar to Pillow, we need to use a much higher value. In this case, a blur radius of 500.
The mask we need for the Telea inpaint must be the same size as the original mask, without the offset, since that’s the area we want to replace.

We need the model to use this information. Normally, with an inpainting model or with a normal image-to-image model, we decrease the value of strength. But with differential, we can keep this value at the maximum and just make the mask lighter. I’ll use a dark gray for this.
 |
 |
 |
 |
Now, we have some good results, but I still see two problems. We can still see the seam because there’s a slight difference in the colors, and we depend on the prompt to do this. If we pass the wrong prompt (which is highly probable if you use a VLLM), the outpainting will be bad.
To fix both of these problems, we’re going to use IP Adapters. This is pretty obvious; there’s no better way to tell the model the details of the original image than an Image Prompt.
The only problem we have right now is that the original image is not a square image, and IP Adapters only work with square images. There’s a solution to this proposed by the original authors that involves resizing and padding the image, but that would make it feed that information to the model, and we don’t want that because we’re precisely trying to paint that area.
Since we don’t really need to give it an exact composition and we can feed multiple images to the IP Adapter, what we’re going to do is to slice the original image into squares and feed those to the IP Adapter. For this, it’s better to use the larger initial image and then resize each square down to 224x224, which is the size they need.

This function can do this:
def slice_image(image):
    height, width, _ = image.shape
    slice_size = min(width // 2, height // 3)

    slices = []

    for h in range(3):
        for w in range(2):
            left = w * slice_size
            upper = h * slice_size
            right = left + slice_size
            lower = upper + slice_size

            if w == 1 and right > width:
                left -= right - width
                right = width
            if h == 2 and lower > height:
                upper -= lower - height
                lower = height

            slice = image[upper:lower, left:right]
            slices.append(slice)

    return slices
These are the sliced images we get with it:
 |
 |
 |
 |
 |
 |
Without a prompt and since we're feeding these images to the IP Adapter, we can lower the CFG to about 4.0
 |
 |
 |
 |
Sometimes we can get images that still have seams but most of the time they're good and we fixed the color difference because the IP Adapter gave that information to the model.
Now we have a script that can expand portrait/landscape images without the need of a prompt, these are tests I did with other images:
| original | expanded |
|---|---|
 |
 |
 |
 |
 |
 |
 |
 |
With this method, if the subject that you want to preserve is positioned at the border, it will change a little because we’re using a blurred mask. If you don’t want this, you can try to reduce the blur and the offset of the mask. If that doesn’t work, the only alternative is to use an inpainting model.
There are also some images that won’t work with this method. For example, this one:
| original | expanded |
|---|---|
 |
 |
That’s because we only have half of the subject, and also the Telea algorithm expands the colors to the right. In this case, we can give it a little help with the prompt. I’ll use "colored eggs inside a round nest on a table":
 |
 |
The model that you use is also very important. Some models perform outpainting better, while others are better suited for realistic photos or for specific genres like anime, fantasy, etc.
Now, the only thing we have left to do is to create really large outpaints:


This is the complete code. First, I make the image a square and then expand it. You can choose the direction in which to expand it. Please note that this is just a code example. You’ll need to modify it to suit your needs, but hopefully, this will help you get started with this kind of outpainting using diffusers and differential diffusion.
import random
import urllib.request

import cv2
import numpy as np
import torch

from diffusers import DPMSolverMultistepScheduler, StableDiffusionXLPipeline


def merge_images(original, new_image, offset, direction):
    if direction in ["left", "right"]:
        merged_image = np.zeros((original.shape[0], original.shape[1] + offset, 3), dtype=np.uint8)
    elif direction in ["top", "bottom"]:
        merged_image = np.zeros((original.shape[0] + offset, original.shape[1], 3), dtype=np.uint8)

    if direction == "left":
        merged_image[:, offset:] = original
        merged_image[:, : new_image.shape[1]] = new_image
    elif direction == "right":
        merged_image[:, : original.shape[1]] = original
        merged_image[:, original.shape[1] + offset - new_image.shape[1] : original.shape[1] + offset] = new_image
    elif direction == "top":
        merged_image[offset:, :] = original
        merged_image[: new_image.shape[0], :] = new_image
    elif direction == "bottom":
        merged_image[: original.shape[0], :] = original
        merged_image[original.shape[0] + offset - new_image.shape[0] : original.shape[0] + offset, :] = new_image

    return merged_image


def slice_image(image):
    height, width, _ = image.shape
    slice_size = min(width // 2, height // 3)

    slices = []

    for h in range(3):
        for w in range(2):
            left = w * slice_size
            upper = h * slice_size
            right = left + slice_size
            lower = upper + slice_size

            if w == 1 and right > width:
                left -= right - width
                right = width
            if h == 2 and lower > height:
                upper -= lower - height
                lower = height

            slice = image[upper:lower, left:right]
            slices.append(slice)

    return slices


def process_image(
    image,
    fill_color=(0, 0, 0),
    mask_offset=50,
    blur_radius=500,
    expand_pixels=256,
    direction="left",
    inpaint_mask_color=50,
    max_size=1024,
):
    height, width = image.shape[:2]

    new_height = height + (expand_pixels if direction in ["top", "bottom"] else 0)
    new_width = width + (expand_pixels if direction in ["left", "right"] else 0)

    if new_height > max_size:
        # If so, crop the image from the opposite side
        if direction == "top":
            image = image[:max_size, :]
        elif direction == "bottom":
            image = image[new_height - max_size :, :]
        new_height = max_size

    if new_width > max_size:
        # If so, crop the image from the opposite side
        if direction == "left":
            image = image[:, :max_size]
        elif direction == "right":
            image = image[:, new_width - max_size :]
        new_width = max_size

    height, width = image.shape[:2]

    new_image = np.full((new_height, new_width, 3), fill_color, dtype=np.uint8)
    mask = np.full_like(new_image, 255, dtype=np.uint8)
    inpaint_mask = np.full_like(new_image, 0, dtype=np.uint8)

    mask = cv2.cvtColor(mask, cv2.COLOR_BGR2GRAY)
    inpaint_mask = cv2.cvtColor(inpaint_mask, cv2.COLOR_BGR2GRAY)

    if direction == "left":
        new_image[:, expand_pixels:] = image[:, : max_size - expand_pixels]
        mask[:, : expand_pixels + mask_offset] = inpaint_mask_color
        inpaint_mask[:, :expand_pixels] = 255
    elif direction == "right":
        new_image[:, :width] = image
        mask[:, width - mask_offset :] = inpaint_mask_color
        inpaint_mask[:, width:] = 255
    elif direction == "top":
        new_image[expand_pixels:, :] = image[: max_size - expand_pixels, :]
        mask[: expand_pixels + mask_offset, :] = inpaint_mask_color
        inpaint_mask[:expand_pixels, :] = 255
    elif direction == "bottom":
        new_image[:height, :] = image
        mask[height - mask_offset :, :] = inpaint_mask_color
        inpaint_mask[height:, :] = 255

    # mask blur
    if blur_radius % 2 == 0:
        blur_radius += 1
    mask = cv2.GaussianBlur(mask, (blur_radius, blur_radius), 0)

    # telea inpaint
    _, mask_np = cv2.threshold(inpaint_mask, 128, 255, cv2.THRESH_BINARY | cv2.THRESH_OTSU)
    inpaint = cv2.inpaint(new_image, mask_np, 3, cv2.INPAINT_TELEA)

    # convert image to tensor
    inpaint = cv2.cvtColor(inpaint, cv2.COLOR_BGR2RGB)
    inpaint = torch.from_numpy(inpaint).permute(2, 0, 1).float()
    inpaint = inpaint / 127.5 - 1
    inpaint = inpaint.unsqueeze(0).to("cuda")

    # convert mask to tensor
    mask = torch.from_numpy(mask)
    mask = mask.unsqueeze(0).float() / 255.0
    mask = mask.to("cuda")

    return inpaint, mask


def image_resize(image, new_size=1024):
    height, width = image.shape[:2]

    aspect_ratio = width / height
    new_width = new_size
    new_height = new_size

    if aspect_ratio != 1:
        if width > height:
            new_height = int(new_size / aspect_ratio)
        else:
            new_width = int(new_size * aspect_ratio)

    image = cv2.resize(image, (new_width, new_height), interpolation=cv2.INTER_LANCZOS4)

    return image


pipeline = StableDiffusionXLPipeline.from_pretrained(
    "SG161222/RealVisXL_V4.0",
    torch_dtype=torch.float16,
    variant="fp16",
    custom_pipeline="pipeline_stable_diffusion_xl_differential_img2img",
).to("cuda")
pipeline.scheduler = DPMSolverMultistepScheduler.from_config(pipeline.scheduler.config, use_karras_sigmas=True)

pipeline.load_ip_adapter(
    "h94/IP-Adapter",
    subfolder="sdxl_models",
    weight_name=[
        "ip-adapter-plus_sdxl_vit-h.safetensors",
    ],
    image_encoder_folder="models/image_encoder",
)
pipeline.set_ip_adapter_scale(0.1)


def generate_image(prompt, negative_prompt, image, mask, ip_adapter_image, seed: int = None):
    if seed is None:
        seed = random.randint(0, 2**32 - 1)

    generator = torch.Generator(device="cpu").manual_seed(seed)

    image = pipeline(
        prompt=prompt,
        negative_prompt=negative_prompt,
        width=1024,
        height=1024,
        guidance_scale=4.0,
        num_inference_steps=25,
        original_image=image,
        image=image,
        strength=1.0,
        map=mask,
        generator=generator,
        ip_adapter_image=[ip_adapter_image],
        output_type="np",
    ).images[0]

    image = (image * 255).astype(np.uint8)
    image = cv2.cvtColor(image, cv2.COLOR_BGR2RGB)

    return image


prompt = ""
negative_prompt = ""
direction = "right"  # left, right, top, bottom
inpaint_mask_color = 50  # lighter use more of the Telea inpainting
expand_pixels = 256  # I recommend to don't go more than half of the picture so it has context
times_to_expand = 4

url = "https://huggingface.co/datasets/OzzyGT/testing-resources/resolve/main/differential/photo-1711580377289-eecd23d00370.jpeg?download=true"

with urllib.request.urlopen(url) as url_response:
    img_array = np.array(bytearray(url_response.read()), dtype=np.uint8)

original = cv2.imdecode(img_array, -1)
image = image_resize(original)
expand_pixels_to_square = 1024 - image.shape[1]  # image.shape[1] for horizontal, image.shape[0] for vertical
image, mask = process_image(
    image, expand_pixels=expand_pixels_to_square, direction=direction, inpaint_mask_color=inpaint_mask_color
)

ip_adapter_image = []
for index, part in enumerate(slice_image(original)):
    ip_adapter_image.append(part)

generated = generate_image(prompt, negative_prompt, image, mask, ip_adapter_image)
final_image = generated

for i in range(times_to_expand):
    image, mask = process_image(
        final_image, direction=direction, expand_pixels=expand_pixels, inpaint_mask_color=inpaint_mask_color
    )

    ip_adapter_image = []
    for index, part in enumerate(slice_image(generated)):
        ip_adapter_image.append(part)

    generated = generate_image(prompt, negative_prompt, image, mask, ip_adapter_image)
    final_image = merge_images(final_image, generated, 256, direction)

cv2.imwrite("result.png", final_image)